Bring Back your MI devices from dead this tutorial is applicable for every MI phones listed below so lets begin .
Compatible Xiaomi Phones:
All the Xiaomi smartphones namely Xiaomi Mi 4, Mi 4i, Mi 3, Mi4c, Redmi Note 2, Mi Note, Redmi 1S, Redmi Note 3G/4G, Redmi 2/Prime, and Mi 5 are compatible with the below fastboot flashing process.
It is advisable to perform a total backup of all your important data and charge your device.
What we Need?
1. Fastboot/Adb Driver Download
2. MI Flash Tool Download
How to Setup?
1. Connect your Device with PC/Laptop and Run AdbDriver.exe
2. Complete Necessary Action and make sure Drivers Successfully Installed.
3. Now Run MiFlashSetup.msi and complete installation.
Note : MiFlashSetup.msi require dotnetfx35setup make sure it's installed other wise software will guide you to but you should have active internet connection
Imp : Before you begin you should that you should unlock you Mi phone to flash fastboot rom
How to Flash Fastboot Rom on Mi Device
Compatible Xiaomi Phones:
All the Xiaomi smartphones namely Xiaomi Mi 4, Mi 4i, Mi 3, Mi4c, Redmi Note 2, Mi Note, Redmi 1S, Redmi Note 3G/4G, Redmi 2/Prime, and Mi 5 are compatible with the below fastboot flashing process.
It is advisable to perform a total backup of all your important data and charge your device.
What we Need?
1. Fastboot/Adb Driver Download
2. MI Flash Tool Download
How to Setup?
1. Connect your Device with PC/Laptop and Run AdbDriver.exe
2. Complete Necessary Action and make sure Drivers Successfully Installed.
3. Now Run MiFlashSetup.msi and complete installation.
Note : MiFlashSetup.msi require dotnetfx35setup make sure it's installed other wise software will guide you to but you should have active internet connection
Imp : Before you begin you should that you should unlock you Mi phone to flash fastboot rom
How to Flash Fastboot Rom on Mi Device
2. Run XiaoMiFlash.exe and Choose Select option and choose Rom folder.
3. Now Turn off the device and enter into Fastboot mode. You need to press Volume Down + Power button at the same time to boot your device into fastboot mode.
4. Connect your device with PC and Click on Refresh button in MiFlash to see the connected devices.
5. Once the device is detected, you have three options to choose as per your requirement as show in the above image.
Clean All:- Clears all the data of the built-in storage, clear all user data, please be careful!
Higly Recommended [When Coming from Custom Rom only]
Save User Data:- Highly Recommended [When Flashing/upgrading MIUI Rom only]
Clean All and Lock:- Simple will clear everything. [Not recommended save for last option].
6. Tap on ‘Flash’ at the top right to start the flashing process.
10. Once done with the flashing process, the device will reboot automatically.
Note: As it is the first reboot after flashing ROM, it might take up to 20-25 minutes. So, hold your seats and wait or have a cup of coffee.
If you face any problem while flashing Fastboot ROM, leave a comment below as we are always there to help you out.
Xiaomi Advices and Xiaomi is not responsible for any damage occurs to your handset in case the below steps are not followed correctly.

So Finally Wait is over here it is MIUI 7 for Redmi 1s with 10% More Battery and 30% Faster System Response.
Yes thats what MI says and you will feel the difference.
ROM Links given below are GLOBAL BETA ROM .
for stable rom go here
RECOVERY ROM LINK Mirror 6.4.14 DEVELOPER ROM
Direct
Direct2
RECOVERY ROM LINK Mirror 6.1.8 DEVELOPER ROM
Direct
Direct2
RECOVERY ROM LINK Mirror 5.12.24 DEVELOPER ROM
Direct
Direct2
RECOVERY ROM LINK Mirror 5.12.10 DEVELOPER ROM
Direct
Direct2
FASTBOOT ROM LINK Mirror 5.12.10 DEVELOPER ROM
Server 1
Server 2
----------------------------------------------------------------------
How to Flash Fast-Boot ROM
RECOVERY ROM LINK Mirror 5.12.1 DEVELOPER ROM
Direct
Direct2
FASTBOOT ROM LINK Mirror 5.12.1 DEVELOPER ROM
Server 1
Server 2
How to Flash Fast-Boot ROM
RECOVERY ROM LINK Mirror 5.11.12 DEVELOPER ROM
Direct
Direct2
RECOVERY ROM LINK Mirror 5.11.6 DEVELOPER ROM
Direct
Direct2
FASTBOOT ROM LINK Mirror 5.11.6 DEVELOPER ROM
Server 1
Server 2
How to Flash Fast-Boot ROM
RECOVERY ROM LINK Mirror 5.10.15 DEVELOPER ROM
Direct
Direct2
FASTBOOT ROM LINK Mirror 5.9.25 DEVELOPER ROM
Server 1
Server 2
How to Flash Fast-Boot ROM
RECOVERY ROM LINK Mirror 5.9.25 DEVELOPER ROM
Direct
Direct2
FASTBOOT ROM LINK Mirror 5.9.25 DEVELOPER ROM
Server 1
Server 2
How to Flash Fast-Boot ROM
RECOVERY ROM LINK Mirror 5.9.24 BETA ROM
Direct
Direct2
RECOVERY ROM LINK Mirror 5.9.22 BETA ROM
Direct
Direct2
RECOVERY ROM LINK Mirror 5.9.17 BETA ROM
Direct
Direct2
RECOVERY ROM LINK Mirror 5.9.16 DEVELOPER ROM
Direct
Direct2
FASTBOOT ROM LINK Mirror 5.9.16 DEVELOPER ROM
Server 1
Server 2
How to Flash Fast-Boot ROM
RECOVERY ROM LINK Mirror 5.9.15 BETA ROM
Direct
Direct2
RECOVERY ROM LINK Mirror 5.9.10 BETA ROM
Direct
Direct2
[Changelog @ end of the post]
RECOVERY ROM LINK Mirror 5.9.1 BETA ROM
Direct
Direct2
----------------------------------------------------------------------------------------------------
RECOVERY ROM LINK Mirror 5.8.28 DEVELOPER ROM
Direct
Direct2
[Change-Log Scroll Down]
FASTBOOT ROM LINK Mirror 5.8.28 DEVELOPER ROM
Server 1
Server 2
How to Flash Fast-Boot ROM
RECOVERY ROM LINK Mirror 5.8.24
Direct
Google
RECOVERY ROM LINK Mirror 5.8.22
Direct Link
Google Drive
Uppit
IndiShare
Flashing Method is Same [if you got problem checkout some links given below]
Simplest Method with stock recovery :
1. Connect your phone to the computer.
2. Copy the ROM file to the folder downloaded_rom in the internal memory.
3. Open Updater on the launcher
4. Press the Menu button – Select installation file.
5. Choose the ROM zip you want to flash and select Update now.
6. After updating is completed, select Reboot now to enter the new system.
OR Rename the downloaded file to update.zip and go to recovery just by pulling out your Battery and insert it again press volume up + power button until your device boot in stock recovery.
Now Clear cache and Flash update.zip
If you got any problem try this
How to Flash MIUI Rom with Stock Recovery
If you have twrp recovery you can try this
1. Go to Recovery just by pulling out your Battery and insert it again press volume up + power button until your device boot in twrp recovery.
2. First press Setting then press screen now uncheck Enable Screen Timeout.
3. Now go back to main option screen and select Wipe option.
Now select Advance wipe and Select Dalvik Cache + Cache only.
Now Swipe the arrow at bottom saying Swipe to Wipe. Wait
4. Now go back to main option screen and select Install option and choose Rom file just downloaded.
5. Now Swipe to install.
6. After Flashing Done Press wipe dalvik and cache [see bottom left hand side.]
7. Reboot your device and wait for 15Min.
Didn't got new themes click here
MIUI 7 Global BETA ROM 6.1.8 Full Change-Log
System
Optimization - Improved algorithms for Silent and DND modes to be used at the same time. (04-13)
Lockscreen, Status Bar, Notification Bar
Fix - Music lock screen appeared when a game was running in the background (04-06)
Settings
Optimization - Improved algorithms for international roaming (04-06)
Cleaner
Optimization - Press and hold to add items to exceptions (04-06)
Optimization - Fixed problems with performance after clean-ups (04-06)
Mi Cloud
Fix - Couldn't find device or sign in to Mi Account due to wrong system time (04-06)
Ricky Febrian
May 26, 2016
New Google SEO
Bandung, IndonesiaYes thats what MI says and you will feel the difference.
ROM Links given below are GLOBAL BETA ROM .
for stable rom go here
RECOVERY ROM LINK Mirror 6.4.14 DEVELOPER ROM
Direct
Direct2
RECOVERY ROM LINK Mirror 6.1.8 DEVELOPER ROM
Direct
Direct2
RECOVERY ROM LINK Mirror 5.12.24 DEVELOPER ROM
Direct
Direct2
RECOVERY ROM LINK Mirror 5.12.10 DEVELOPER ROM
Direct
Direct2
FASTBOOT ROM LINK Mirror 5.12.10 DEVELOPER ROM
Server 1
Server 2
----------------------------------------------------------------------
How to Flash Fast-Boot ROM
RECOVERY ROM LINK Mirror 5.12.1 DEVELOPER ROM
Direct
Direct2
FASTBOOT ROM LINK Mirror 5.12.1 DEVELOPER ROM
Server 1
Server 2
How to Flash Fast-Boot ROM
RECOVERY ROM LINK Mirror 5.11.12 DEVELOPER ROM
Direct
Direct2
RECOVERY ROM LINK Mirror 5.11.6 DEVELOPER ROM
Direct
Direct2
FASTBOOT ROM LINK Mirror 5.11.6 DEVELOPER ROM
Server 1
Server 2
How to Flash Fast-Boot ROM
RECOVERY ROM LINK Mirror 5.10.15 DEVELOPER ROM
Direct
Direct2
FASTBOOT ROM LINK Mirror 5.9.25 DEVELOPER ROM
Server 1
Server 2
How to Flash Fast-Boot ROM
RECOVERY ROM LINK Mirror 5.9.25 DEVELOPER ROM
Direct
Direct2
FASTBOOT ROM LINK Mirror 5.9.25 DEVELOPER ROM
Server 1
Server 2
How to Flash Fast-Boot ROM
RECOVERY ROM LINK Mirror 5.9.24 BETA ROM
Direct
Direct2
RECOVERY ROM LINK Mirror 5.9.22 BETA ROM
Direct
Direct2
RECOVERY ROM LINK Mirror 5.9.17 BETA ROM
Direct
Direct2
RECOVERY ROM LINK Mirror 5.9.16 DEVELOPER ROM
Direct
Direct2
FASTBOOT ROM LINK Mirror 5.9.16 DEVELOPER ROM
Server 1
Server 2
How to Flash Fast-Boot ROM
RECOVERY ROM LINK Mirror 5.9.15 BETA ROM
Direct
Direct2
RECOVERY ROM LINK Mirror 5.9.10 BETA ROM
Direct
Direct2
[Changelog @ end of the post]
RECOVERY ROM LINK Mirror 5.9.1 BETA ROM
Direct
Direct2
----------------------------------------------------------------------------------------------------
RECOVERY ROM LINK Mirror 5.8.28 DEVELOPER ROM
Direct
Direct2
[Change-Log Scroll Down]
FASTBOOT ROM LINK Mirror 5.8.28 DEVELOPER ROM
Server 1
Server 2
How to Flash Fast-Boot ROM
RECOVERY ROM LINK Mirror 5.8.24
Direct
RECOVERY ROM LINK Mirror 5.8.22
Direct Link
Google Drive
Uppit
IndiShare
Flashing Method is Same [if you got problem checkout some links given below]
Simplest Method with stock recovery :
1. Connect your phone to the computer.
2. Copy the ROM file to the folder downloaded_rom in the internal memory.
3. Open Updater on the launcher
4. Press the Menu button – Select installation file.
5. Choose the ROM zip you want to flash and select Update now.
6. After updating is completed, select Reboot now to enter the new system.
OR Rename the downloaded file to update.zip and go to recovery just by pulling out your Battery and insert it again press volume up + power button until your device boot in stock recovery.
Now Clear cache and Flash update.zip
If you got any problem try this
How to Flash MIUI Rom with Stock Recovery
If you have twrp recovery you can try this
1. Go to Recovery just by pulling out your Battery and insert it again press volume up + power button until your device boot in twrp recovery.
2. First press Setting then press screen now uncheck Enable Screen Timeout.
3. Now go back to main option screen and select Wipe option.
Now select Advance wipe and Select Dalvik Cache + Cache only.
Now Swipe the arrow at bottom saying Swipe to Wipe. Wait
4. Now go back to main option screen and select Install option and choose Rom file just downloaded.
5. Now Swipe to install.
6. After Flashing Done Press wipe dalvik and cache [see bottom left hand side.]
7. Reboot your device and wait for 15Min.
Didn't got new themes click here
MIUI 7 Global BETA ROM 6.1.8 Full Change-Log
System
Optimization - Improved algorithms for Silent and DND modes to be used at the same time. (04-13)
Lockscreen, Status Bar, Notification Bar
Fix - Music lock screen appeared when a game was running in the background (04-06)
Settings
Optimization - Improved algorithms for international roaming (04-06)
Cleaner
Optimization - Press and hold to add items to exceptions (04-06)
Optimization - Fixed problems with performance after clean-ups (04-06)
Mi Cloud
Fix - Couldn't find device or sign in to Mi Account due to wrong system time (04-06)
updated to 3.0.0.0 Flash TWRP Recovery with these simple steps but first i want you to first read whole process then download all files and after that start step by step. From both PC and Mobile.
FROM PC via Flash Recovery v1
Ricky Febrian
February 06, 2016
New Google SEO
Bandung, IndonesiaFROM PC via Flash Recovery v1
No More Command typing with Flash Recovery v1.rar
Prerequisites :
1. Download this file here Flash Recovery v1.rar
3. Of-course working twrp.img for your device
1. Download this file here Flash Recovery v1.rar
3. Of-course working twrp.img for your device
[Note you can flash any recovery but I like twrp most]
Download these files
TWRP 3.0.0.0
Latest TWRP Recovery Link [Added]
Redmi1s usb drivers [skip if already have]
[FAST-BOOT METHOD] : Recommended
1. Install xiaomi usb drivers
2. Extract Flash Recovery v1.rar
3. Copy recovery.img to Flash Recovery v1 folder
Note: Make sure to rename twrp-2.x.x.x-armani.img to recovery.img
4. Turn off your device remove battery and insert again.
5. Turn on the device while holding volume down and power.
[Simply press volume down button and then press power button you will be in fastboot mode.]
5. Plug the device into your computer.
6. Now Double Click on install-windows name file.
7. You Recovery will be flashed.
FROM PHONE via updater app
METHOD 1
1. First of all Download this file recovery.zip
2. Move it to internal Memory.
3. Open updater app in your mobile. [Press 3 Dots in right hand side corner]
4. Choose Select update package
5. Scroll Down and Select recovery.zip
6.Select update and start update.
METHOD 2
1. Download recovery.zip [Link at start of post] and go to setting - About - Press System Update.
2. Press Menu key you will see four option Choose Select update package
3. Now Select recovery.zip you just downloaded and press update.
4. Wait for Reboot.
To go into Recovery Mode Turn off device remove battery then insert battery press volume up button and while holding volume up button press power button don't leave until you are in recovery.
Download these files
TWRP 3.0.0.0
Latest TWRP Recovery Link [Added]
Redmi1s usb drivers [skip if already have]
[FAST-BOOT METHOD] : Recommended
1. Install xiaomi usb drivers
2. Extract Flash Recovery v1.rar
3. Copy recovery.img to Flash Recovery v1 folder
Note: Make sure to rename twrp-2.x.x.x-armani.img to recovery.img
4. Turn off your device remove battery and insert again.
5. Turn on the device while holding volume down and power.
[Simply press volume down button and then press power button you will be in fastboot mode.]
5. Plug the device into your computer.
6. Now Double Click on install-windows name file.
7. You Recovery will be flashed.
FROM PHONE via updater app
METHOD 1
1. First of all Download this file recovery.zip
2. Move it to internal Memory.
3. Open updater app in your mobile. [Press 3 Dots in right hand side corner]
4. Choose Select update package
5. Scroll Down and Select recovery.zip
6.Select update and start update.
METHOD 2
1. Download recovery.zip [Link at start of post] and go to setting - About - Press System Update.
2. Press Menu key you will see four option Choose Select update package
3. Now Select recovery.zip you just downloaded and press update.
4. Wait for Reboot.
To go into Recovery Mode Turn off device remove battery then insert battery press volume up button and while holding volume up button press power button don't leave until you are in recovery.
As we know latest MIUI Rom updates have no font change option in settings this app will help you to change the font of system and the best thing about this app is
It supports
1. Work without Root [ For Now Not Working]
2. XiaoMi (MIUI) Rom
3. Support to modify the font size, support for custom fonts.
4. Automatic backup fonts easily restore the factory font
5. Change font size,make size from small to big.
It supports
1. Work without Root [ For Now Not Working]
2. XiaoMi (MIUI) Rom
3. Support to modify the font size, support for custom fonts.
4. Automatic backup fonts easily restore the factory font
5. Change font size,make size from small to big.
2. Choose 3rd option "titled" MY
3. Click on Setting and choose Change font mode
4. Change it to System mode [ First option] and press ok.
5. Now Select first option "titled" RECOM and download any font you like.
CPU Governors explained with there in performance,Battery life. Know which saves more battery and which governor give you Max performance.
All information about CPU and GPU Governor and Hot-plugging in taken from xda
Listed below are governors included in The Beast Kernel for Redmi 1s List will go up.
Lets Begin
CPU Governor's
1. OnDemand : is one of the original and oldest governors.
1. self-boost capability from input drivers (no need for PowerHAL assist)
2. two phase scheduling (idle/busy phases to prevent from jumping directly to max freq)
3. Checks for offline cpus and short circuits some unnecessary checks to improve code execution paths. Therefore, it avoids CPU hot-plugging.
I/O Scheduler:All information about CPU and GPU Governor and Hot-plugging in taken from xda
Listed below are governors included in The Beast Kernel for Redmi 1s List will go up.
Lets Begin
CPU Governor's
1. OnDemand : is one of the original and oldest governors.
it will quickly ramp up to the maximum CPU frequency when the load placed on your CPU reaches the set threshold. It has excellent performance because of this high-frequency bias, but it also have a relatively negative effect on battery life versus other governors. OnDemand was commonly chosen by smartphone manufacturers in the past because it is well-tested and reliable, but it is outdated now and is being replaced by Google's Interactive governor.
2. Performance : The performance governor locks the phone's CPU at maximum frequency. Not battery friendly.
3. Powersave : The opposite of the Performance governor, it locks the CPU frequency at the lowest frequency set by the user. Not Performance friendly LAG LAG LAG.
4. Conservative : Governor prefer to set the lowest possible clock speed as often as possible.
The conservative governor can give best performance with good battery life.
5. Userspace : Its rare for mobile devices. Forget it.
6. IntelliActive : Based off Google's Interactive governor with the following enhancements:1. self-boost capability from input drivers (no need for PowerHAL assist)
2. two phase scheduling (idle/busy phases to prevent from jumping directly to max freq)
3. Checks for offline cpus and short circuits some unnecessary checks to improve code execution paths. Therefore, it avoids CPU hot-plugging.
Created by Faux
7. Smartmax : By default this is configured for Battery Saving so this is not for gamers
Input events from the touchscreen will boost the cpu for a specific time to a specific frequency. Developed by XDA user Maxwen
8. Yankactive : A slightly modified interactive based governor by Yank555.lu.
Include more battery tweaks - so expect better Battery Saving
9. Nightmare : A good Balance between performance and battery.
10. Impulse : Improved version of interactive governor. Aim to have a balance between battery and performance just like interactive but has some tweaks to save battery. modified by neobuddy89.
So if you are using interactive governor try this.
11. Darkness : Based on nightmare governor but more simple and fast.
12. Alucard : Alucard is based on ondemand governor but tweaked to bring better battery life and performance. It has been known to be battery friendly without sacrificing much performance.
Created by Alucard_24.
13. Interactive: Interactive is prepared to intermediate clockspeeds between the minimum and maximum CPU frequencies. It is significantly more responsive than OnDemand, because it's faster at scaling to maximum frequency.
Input events from the touchscreen will boost the cpu for a specific time to a specific frequency. Developed by XDA user Maxwen
8. Yankactive : A slightly modified interactive based governor by Yank555.lu.
Include more battery tweaks - so expect better Battery Saving
9. Nightmare : A good Balance between performance and battery.
10. Impulse : Improved version of interactive governor. Aim to have a balance between battery and performance just like interactive but has some tweaks to save battery. modified by neobuddy89.
So if you are using interactive governor try this.
11. Darkness : Based on nightmare governor but more simple and fast.
12. Alucard : Alucard is based on ondemand governor but tweaked to bring better battery life and performance. It has been known to be battery friendly without sacrificing much performance.
Created by Alucard_24.
13. Interactive: Interactive is prepared to intermediate clockspeeds between the minimum and maximum CPU frequencies. It is significantly more responsive than OnDemand, because it's faster at scaling to maximum frequency.
GPU Governor's
1. MSM Cpufreq: The MSM CPUfreq governor determines the CPU to DDR bandwidth vote based on the current CPU frequency of all the active CPUs. In other words, this governor scales based on CPU usage which could mean more performance.
2. MSM-Adreno: The default GPU governor used by qualcomm for their adreno GPUs. It is more performance orientated than ondemand therefore it gives better performance in games but less battery life. Still a balanced governor for everyday usage.
3. Userspace: This governor basically allows the user is able to set a desired frequency for the GPU to run at.
4. Performance: As the name suggests, this keeps your GPU running at the max frequency. This is a governor if you want the best possible experience in games but you don't care about your battery life.
7. Ondemand: Much like the CPU governor, Ondemand will ramp up the frequency when a load is detected. A good balance between performance and battery savings. This is a widely used governor in qualcomm devices. 5. Powersave: Like the CPU governor, this keeps your GPU running at the lowest possible frequency. Best battery life, extreme lag in games.
6. Simple: It's a new governor for the gpu frequency scaling. It will allow a more fine grained control over how the gpu scales up and down then the previous ones. Depending how you tune it, it can be better for battery life or performance. CPU Hotplugging drivers:
1. mpdecision: Qualcomm's default hotplugging driver. One of the most widely used hotplug drivers in all android devices.
2. msm_hotplug: Great battery life, a custom qualcomm based hotplugging driver by myflux. It is a popular choice for many users.
3. intelliplug: Great balance between battery life and performance. It is also a popular hotplug driver from faux123.
4. Alucard: A great hotplugging driver by Alucard. It is known to be very battery friendly on devices.
5. Adreno Idler: It is an idling algorithm, an efficient workaround for msm-adreno-tz overheads. Main goal is to lower the power consumption while maintaining high-performance.
5. Adreno Idler: It is an idling algorithm, an efficient workaround for msm-adreno-tz overheads. Main goal is to lower the power consumption while maintaining high-performance.
1. CFQ: Well Balanced I/O Performance, Beneficial for multi-core processors and good for multitasking.
Media scanning is slow
2. Tripndroid : One of the best based on noop, deadline and vr, Best I/O performance and better multitasking.
3. FIOPS : Fair IOPS - Good for Battery life,faster app launching, increase in UI perfomance on the other hand sometimes can make phone lag, not for heavy multitasking.
4. ZEN: Based on vr scheduler but efficient and stable than vr. not a good performance scheduler.
| For | Size |
|---|---|
| Stability | Use 128kB read-head value |
| Performance | Use 2048kB read-head value |
| SD Card < 8GB | Use 128kB read-head value |
| SD Card < 16GB | Use 1024kB read-head value |
| SD Card 64GB+ | Use 2048kB read-head value |
You may had flashed custom rom on your device and there are possibilities that you not satisfied with performance of your custom rom then you should try this custom kernel for redmi 1s with amazing features let's check out the list of highlight features.
Supports all ROM based on KK/LP Now support MIUI Roms.
For Kernel Configuration install Kernel Auditor App from Play Store
Features
Kernel Special Features:
alucard hotplug
msm_hotplug
bricked_hotplug,
kcal : Advanced Color Controll
dt2w : DoubleTap2Wake Phone will wake up when you double tap on screen.
s2w : Sweep to Wake
Smoothness Working Multitasking,
Better Battery and
FAST CHARGE Better Performance.
Download
TheBeast-v7-Miui.zip
TheBeast-v7-CM-DataFix.zip
How to Install Flash this kernel
1. Boot into recovery
2. Wipe cache and dalvik cache.
3. Select Zip and Flash kernel
4. Reboot
Note if you are already using other custom kernel first flash stock boot.img you can extract file from ROM.ZIP and flash it through flashify app
Ricky Febrian
December 03, 2015
New Google SEO
Bandung, IndonesiaSupports all ROM based on KK/LP Now support MIUI Roms.
For Kernel Configuration install Kernel Auditor App from Play Store
Features
Kernel Special Features:
alucard hotplug
msm_hotplug
bricked_hotplug,
kcal : Advanced Color Controll
dt2w : DoubleTap2Wake Phone will wake up when you double tap on screen.
s2w : Sweep to Wake
Smoothness Working Multitasking,
Better Battery and
FAST CHARGE Better Performance.
Download
TheBeast-v7-Miui.zip
TheBeast-v7-CM-DataFix.zip
How to Install Flash this kernel
1. Boot into recovery
2. Wipe cache and dalvik cache.
3. Select Zip and Flash kernel
4. Reboot
Note if you are already using other custom kernel first flash stock boot.img you can extract file from ROM.ZIP and flash it through flashify app
Credits :
Xda users : Luffy.d, faux123, YoshiShaPow, Armani Devs,Khan_frd2002,fermasia
Source : http://forum.xda-developers.com/redmi-1s/orig-development/kernel-beast-kernel-t2998620
Xda users : Luffy.d, faux123, YoshiShaPow, Armani Devs,Khan_frd2002,fermasia
Source : http://forum.xda-developers.com/redmi-1s/orig-development/kernel-beast-kernel-t2998620
As many of us confuse whether miui6 root file will work with miui 7.0.5.0 global rom this post will clear all things and credit for the process and zip file goes to miui user Arvanasoft.
How to Root
1. Download NativeRoot_Redmi1S_Miui7GlobalStable.zip
2. Extract downloaded zip you will get 2 files Root and unroot:
3. Go to the Updater and press 3 dots on upper right corner.
4. Select Choose update package and select the file to root
Root_update_Redmi1s_Miui7global.zip and proceed after reboot.
5. Install any apps that require root access eg. Titanium Backup
6. Once installed open the application, the application will then require root access.
7. To give Root Access to these apps. goto Security > Permissions > Root Access > 'App name'
How to Un-Root
1. Goto Security > Permissions > Root Access > Disable this apps that require root access, Clear data Security (from app Management).
1. Go to the Updater and press 3 dots on upper right corner.
2. Select Choose update package and select the file to un-root
Ricky Febrian
December 01, 2015
New Google SEO
Bandung, IndonesiaHow to Root
1. Download NativeRoot_Redmi1S_Miui7GlobalStable.zip
2. Extract downloaded zip you will get 2 files Root and unroot:
3. Go to the Updater and press 3 dots on upper right corner.
4. Select Choose update package and select the file to root
Root_update_Redmi1s_Miui7global.zip and proceed after reboot.
5. Install any apps that require root access eg. Titanium Backup
6. Once installed open the application, the application will then require root access.
7. To give Root Access to these apps. goto Security > Permissions > Root Access > 'App name'
How to Un-Root
1. Goto Security > Permissions > Root Access > Disable this apps that require root access, Clear data Security (from app Management).
1. Go to the Updater and press 3 dots on upper right corner.
2. Select Choose update package and select the file to un-root
UnRootNative_Redmi1S_Miui7global.zip and proceed reboot.
You can also use this method How to Root Miui6 and Miui7
Once again thanks to miui user Arvanasoft.
Once again thanks to miui user Arvanasoft.
If you are also from those user who are seeing mdsnd app draining battery in battery stats in miui rom or other here is the temporarily solution for this..
For MIUI 7 Rom
◘Long Press on gps icon and disable location access.
For Other Rom and Devices
◘ Go to Settings Find Location setting and turn it off when not in use
Ricky Febrian
November 28, 2015
New Google SEO
Bandung, IndonesiaFor MIUI 7 Rom
◘Long Press on gps icon and disable location access.
For Other Rom and Devices
◘ Go to Settings Find Location setting and turn it off when not in use
This is OTA Updates are for MIUI 7 Global Developer Beta updates for REDMI 1s
Incremental Updates
1. 5.8.22 to 5.8.27 Link 1 Link 2 [Nightly]
2. 5.8.24 to 5.8.27 Link 1 Link 2 [Nightly]
3. 5.8.24 to 5.8.28 Link 1 Link 2 [Nightly]
4. 5.8.27 to 5.8.28 Link 1 Link 2 [Nightly]
5. 5.8.28 to 5.9.16 Link 1 Link 2 [Nightly]
6. 5.8.16 to 5.9.22 Link 1 Link 2 [Nightly]
7. 5.8.27 to 5.9.1 Link 1 Link 2 [Nightly]
8. 5.9.15 to 5.9.22 Link 1 Link 2 [Nightly]
9. 5.9.10 to 5.9.22 Link 1 Link 2 [Nightly]
10. 5.9.15 to 5.9.17 Link 1 Link 2 [Nightly]
11. 5.9.17 to 5.9.22 Link 1 Link 2 [Nightly]
12. 5.9.17 to 5.9.24 Link 1 Link 2 [Nightly]
13. 5.9.16 to 5.9.25 Link 1 Link 2 [Nightly]
14. 5.9.22 to 5.9.24 Link 1 Link 2 [Nightly]
15. 5.9.24 to 5.9.25 Link 1 Link 2 [Nightly]
16. 5.9.24 to 5.9.29 Link 1 Link 2 [Nightly]
17. 5.9.25 to 5.10.15 Link 1 Link 2 [Nightly]
18. 5.10.15 to 5.11.6 Link 1 Link 2 [Nightly]
19. 5.11.6 to 5.11.12 Link 1 Link 2 [Nightly]
Info : if you are on 5.8.22 then first flash 1st 5.8.22 to 5.8.27 file then 5.8.27 to 5.9.1 thank you.
How to Flash OTA updates?
1. Reboot into recovery
2. Select Install and choose ota file
3. Swipe to Flash and wait then reboot your device.
Ricky Febrian
November 22, 2015
New Google SEO
Bandung, IndonesiaIncremental Updates
1. 5.8.22 to 5.8.27 Link 1 Link 2 [Nightly]
2. 5.8.24 to 5.8.27 Link 1 Link 2 [Nightly]
3. 5.8.24 to 5.8.28 Link 1 Link 2 [Nightly]
4. 5.8.27 to 5.8.28 Link 1 Link 2 [Nightly]
5. 5.8.28 to 5.9.16 Link 1 Link 2 [Nightly]
6. 5.8.16 to 5.9.22 Link 1 Link 2 [Nightly]
7. 5.8.27 to 5.9.1 Link 1 Link 2 [Nightly]
8. 5.9.15 to 5.9.22 Link 1 Link 2 [Nightly]
9. 5.9.10 to 5.9.22 Link 1 Link 2 [Nightly]
10. 5.9.15 to 5.9.17 Link 1 Link 2 [Nightly]
11. 5.9.17 to 5.9.22 Link 1 Link 2 [Nightly]
12. 5.9.17 to 5.9.24 Link 1 Link 2 [Nightly]
13. 5.9.16 to 5.9.25 Link 1 Link 2 [Nightly]
14. 5.9.22 to 5.9.24 Link 1 Link 2 [Nightly]
15. 5.9.24 to 5.9.25 Link 1 Link 2 [Nightly]
16. 5.9.24 to 5.9.29 Link 1 Link 2 [Nightly]
17. 5.9.25 to 5.10.15 Link 1 Link 2 [Nightly]
18. 5.10.15 to 5.11.6 Link 1 Link 2 [Nightly]
19. 5.11.6 to 5.11.12 Link 1 Link 2 [Nightly]
Info : if you are on 5.8.22 then first flash 1st 5.8.22 to 5.8.27 file then 5.8.27 to 5.9.1 thank you.
How to Flash OTA updates?
1. Reboot into recovery
2. Select Install and choose ota file
3. Swipe to Flash and wait then reboot your device.
Note: if you are using custom kernel first flash whole rom v5.8.22 then flash update download ota zip otherwise you will get error.
OR
use flashify [For Rooted User Only]
First of all download flashify from playstore
Extract Boot.img from your rom zip and flash with flashify app.
How to Revert Back to MIUI Stock Kernel after flashing Custom Kernel
CHANGE-LOG 5.11.12
Highlight
New - Support adding folders to private folder in file explorer.
New - Added Transfer Feature to help move data from an old MI Device to New one.
Optimization - Greatly Enhanced Browser Start page lauching speed.
Lockscreen ,Status Bar,Notification Bar
Optimization - Support changing wallpaper from top right corner in lock screen when daily lockscreen is enabled.
CHANGE-LOG 5.11.12
Highlight
New - Support adding folders to private folder in file explorer.
New - Added Transfer Feature to help move data from an old MI Device to New one.
Optimization - Greatly Enhanced Browser Start page lauching speed.
Lockscreen ,Status Bar,Notification Bar
Optimization - Support changing wallpaper from top right corner in lock screen when daily lockscreen is enabled.
ANT HAL service is similar to other forms of wireless connectivity on your phone (ie. WiFi, NFC) and will not run or use system resources unless you start an app that requires ANT wireless communication.
It is pre-installed by our device manufacturer to allow the built-in ANT wireless hardware already present in your mobile device.
You may have questions like its draining battery using alot of cpu and can you freeze this app?
The Answer is YES you can freeze this app using titanium backup but ROOT is Must.
I have disabled this service a month ago and haven't noticed it affect anything.
Or you want to know how to use it or How it works then follow this :
1. Download ANT Radio Service
2. Download ANT+ Plugin Service
3. Download Heart Rate Monitor App : This app presents a graph of your heart rate over a time period and real time heart rate as well. If you have a heart rate monitor belt wear it and launch this app. After you toggle the power button inside the app, it recognizes your device and starts reporting heart rate.
Ricky Febrian
November 21, 2015
New Google SEO
Bandung, IndonesiaIt is pre-installed by our device manufacturer to allow the built-in ANT wireless hardware already present in your mobile device.
You may have questions like its draining battery using alot of cpu and can you freeze this app?
The Answer is YES you can freeze this app using titanium backup but ROOT is Must.
I have disabled this service a month ago and haven't noticed it affect anything.
Or you want to know how to use it or How it works then follow this :
1. Download ANT Radio Service
2. Download ANT+ Plugin Service
3. Download Heart Rate Monitor App : This app presents a graph of your heart rate over a time period and real time heart rate as well. If you have a heart rate monitor belt wear it and launch this app. After you toggle the power button inside the app, it recognizes your device and starts reporting heart rate.
This is working Xposed for all Lollipop Rom based on CM12.1
Requirement
Redmi 1s running Rom based on 12.1.
Steps to Follow :
Download all 3 Files given below.
1. Boot into Twrp Recovery.
2. Flash Xposed-v75-sdk22-arm.zip
3. Clear cache & Dalvik cache.
4. Reboot to system.
5. Install XposedInstaller_3.0_alpha4.apk
Note: In case anything goes wrong use uninstaller.zip
Download
• Xposed-v75-sdk22-arm.zip
• XposedInstaller_3.0_alpha4.apk
• Uninstaller [in case anything goes wrong]
[Not my work]
Credits to:
Sainp7
Xposed Developer
Ricky Febrian
November 17, 2015
New Google SEO
Bandung, IndonesiaRequirement
Redmi 1s running Rom based on 12.1.
Steps to Follow :
Download all 3 Files given below.
1. Boot into Twrp Recovery.
2. Flash Xposed-v75-sdk22-arm.zip
3. Clear cache & Dalvik cache.
4. Reboot to system.
5. Install XposedInstaller_3.0_alpha4.apk
Note: In case anything goes wrong use uninstaller.zip
Download
• Xposed-v75-sdk22-arm.zip
• XposedInstaller_3.0_alpha4.apk
• Uninstaller [in case anything goes wrong]
[Not my work]
Credits to:
Sainp7
Xposed Developer
MIUI 7 is ultra-fast, power efficient, and completely designed for you.
Every Redmi 1s user is eagerly waiting for MIUI 7 on there Beast so here it is Chinese Version of MIUI 7 is out with version 5.11.6 i am sharing download link of the same and how to flash miui7 on redmi 1s with different methods.
Miui 7 Chinese v5.12.4
Miui 7 Chinese v5.11.6
Miui 7 Chinese v5.11.1
Miui 7 Chinese v5.10.8
Miui 7 Chinese v5.8.13
Chinese Version Doesn't include Google Apps so download from here :
Android 4.4.x gapps-kk-20140606-signed.zipAndroid 4.4.x (Minimal Gapps)gapps-kk-20140105-signed
OTA Updates :
1. From 5.8.13 to 5.8.17 [15 MB] to flash this you must be on v5.8.13
2. From 5.8.17 to 5.8.18 [11 MB] to flash this you must be on v5.8.17
3. From 5.8.18 to 5.8.19 [14 MB] to flash this you must be on v5.8.18
4. From 5.11.1 to 5.11.6 [56 MB] to flash this you must be on v5.11.1
[Flash one by one if you are on 5.8.13 you have to flash from 1st zip and if on 5.8.17 then reboot and then flash from 2nd zip]
Flashing Method is Same [if you got problem checkout some links given below]
Simplest Method with stock recovery :
1. Connect your phone to the computer.
2. Copy the ROM file to the folder downloaded_rom in the internal memory.
3. Open Updater on the launcher
4. Press the Menu button – Select installation file.
5. Choose the ROM zip you want to flash and select Update now.
6. After updating is completed, select Reboot now to enter the new system.
If you got any problem try this
How to Flash MIUI Rom with Stock Recovery
If you have twrp recovery you can try this
1. Go to Recovery just by pulling out your Battery and insert it again press volume up + power button untill your device boot in twrp recovery.
2. First press Setting then press screen now uncheck Enable Screen Timeout.
3. Now go back to main option screen and select Wipe option.
Now select Advance wipe and Select
Dalvik Cache + Cache + Data + System
Now Swipe the arrow at bottom saying Swipe to Wipe. Wait
4. Now go back to main option screen and select Install option and choose Rom file just downloaded.
5. Now Swipe to install.
6. After Flashing Done Press wipe dalvik and cache [see bottom left hand side.]
7. Reboot your device and wait for 15Min.
Full Changelog Beta Chinese ROM 5.12.4
[Phone]
Fix - Device ID could not be acquired in airplane mode (11-27)
[Lockscreen, Status Bar, Notification Bar]
Optimization - Optimized notifications style (11-27)
Fix - Charging icon was displayed after removing charger (12-03)
Fix - '0' and 'Delete' could not show completely in landscape mode when using PIN password (12-03)
[Home screen]
Fix - Home screen crashed in some situations. (12-02)
[Backup]
Optimization - Changed Transfer feature scanning method to QR code (11-27)
[Settings]
Fix - Private messaging password settings did not work (11-27)
[File Explorer]
Optimization - 'Forgot password' option will show after entering wrong password for private folder repeatedly (12-02)
Fix - Unrecognizable file names after ZIP files are decompressed (11-30)
[Mi Drop]
Fix - Status bar always showed 0% when receiving files using Mi Drop (12-02)
[Cleaner]
New - Support adding apps to white list in one press (11-30)
[Video Phone]
New - Added screens sharing, auto-beautify, and group chat features (11-30)
Ricky Febrian
November 11, 2015
New Google SEO
Bandung, IndonesiaEvery Redmi 1s user is eagerly waiting for MIUI 7 on there Beast so here it is Chinese Version of MIUI 7 is out with version 5.11.6 i am sharing download link of the same and how to flash miui7 on redmi 1s with different methods.
Miui 7 Chinese v5.12.4
Chinese Version Doesn't include Google Apps so download from here :
Android 4.4.x gapps-kk-20140606-signed.zipAndroid 4.4.x (Minimal Gapps)gapps-kk-20140105-signed
OTA Updates :
1. From 5.8.13 to 5.8.17 [15 MB] to flash this you must be on v5.8.13
2. From 5.8.17 to 5.8.18 [11 MB] to flash this you must be on v5.8.17
3. From 5.8.18 to 5.8.19 [14 MB] to flash this you must be on v5.8.18
4. From 5.11.1 to 5.11.6 [56 MB] to flash this you must be on v5.11.1
[Flash one by one if you are on 5.8.13 you have to flash from 1st zip and if on 5.8.17 then reboot and then flash from 2nd zip]
Flashing Method is Same [if you got problem checkout some links given below]
Simplest Method with stock recovery :
1. Connect your phone to the computer.
2. Copy the ROM file to the folder downloaded_rom in the internal memory.
3. Open Updater on the launcher
4. Press the Menu button – Select installation file.
5. Choose the ROM zip you want to flash and select Update now.
6. After updating is completed, select Reboot now to enter the new system.
If you got any problem try this
How to Flash MIUI Rom with Stock Recovery
If you have twrp recovery you can try this
1. Go to Recovery just by pulling out your Battery and insert it again press volume up + power button untill your device boot in twrp recovery.
2. First press Setting then press screen now uncheck Enable Screen Timeout.
3. Now go back to main option screen and select Wipe option.
Now select Advance wipe and Select
Dalvik Cache + Cache + Data + System
Now Swipe the arrow at bottom saying Swipe to Wipe. Wait
4. Now go back to main option screen and select Install option and choose Rom file just downloaded.
5. Now Swipe to install.
6. After Flashing Done Press wipe dalvik and cache [see bottom left hand side.]
7. Reboot your device and wait for 15Min.
Full Changelog Beta Chinese ROM 5.12.4
[Phone]
Fix - Device ID could not be acquired in airplane mode (11-27)
[Lockscreen, Status Bar, Notification Bar]
Optimization - Optimized notifications style (11-27)
Fix - Charging icon was displayed after removing charger (12-03)
Fix - '0' and 'Delete' could not show completely in landscape mode when using PIN password (12-03)
[Home screen]
Fix - Home screen crashed in some situations. (12-02)
[Backup]
Optimization - Changed Transfer feature scanning method to QR code (11-27)
[Settings]
Fix - Private messaging password settings did not work (11-27)
[File Explorer]
Optimization - 'Forgot password' option will show after entering wrong password for private folder repeatedly (12-02)
Fix - Unrecognizable file names after ZIP files are decompressed (11-30)
[Mi Drop]
Fix - Status bar always showed 0% when receiving files using Mi Drop (12-02)
[Cleaner]
New - Support adding apps to white list in one press (11-30)
[Video Phone]
New - Added screens sharing, auto-beautify, and group chat features (11-30)

Dolby Atmos and Viper for your Redmi 1s working and Tested on MIUI6 and MIUI7 by myself.
Download Server1| Server2 | Server3 | Server4
How to Flash ?
1. Boot into TWRP Recovery
2. Select Install option and choose your zip
3. Swipe to flash and press Reboot.
4. Enjoy
Credits for Dolby Atmos for MIUI
robert lindz
ZNXT Team Xperia
Xda Developers
Rieken Yuki ZU,Z3,Z3c
robert lindz
ZNXT Team Xperia
Xda Developers
Rieken Yuki ZU,Z3,Z3c

Here DKILLER123 introduced All in One Pack for miui 5.9.17 with features like
1. Centerclock Mod (Normal Style)
2. Centerclock Mod (IOS Style)
3. Kernels ( Miui Kernel + Balika's Kernel)
4. Emoji Pack
5. AdBlock [you know block the annoying ads]
6. Init Script [use balika kernel or use universal int.d]
7. Seeder [ i didn't select this]
8. Advanced Power Menu [Like Recovery and Fastboot]
9. Supersu (Root) [ i recommend you to don't flash this instead try this ]
10. Xylon Animation [Amazing animations you will love it i did]
11. MiExplorer [ Just like CM file Manager]
12. VolumeBoost Mod [increased and crystal clear sound]
13. WSM Tools [you know its exposed for miui] + Immersed Statusbar Mod [Change status bar color according to app works with whatsapp,facebook,hike etc.]
Best thing about this is its aroma installer so you can select which MOD you want.


NOTE : Don't use this mentioned below functions if you are on other version of miui than 5.9.17
1. Centerclock Mod (Normal Style)
2. Centerclock Mod (IOS Style)
8. Advanced Power Menu [Like Recovery and Fastboot]
10. Xylon Animation [Amazing animations you will love it i did]
Download
MIUIv7_armani_5.9.24_ModsPack_v3.0.zip (82.86 MB)
http://d-h.st/1PpH
MIUIv7_armani_5.9.17_ModsPack_v2.0.zip (69.81MB)
http://d-h.st/OqdB
Credits
DKILLER123 main thread
Ricky Febrian
September 21, 2015
New Google SEO
Bandung, Indonesia1. Centerclock Mod (Normal Style)
2. Centerclock Mod (IOS Style)
3. Kernels ( Miui Kernel + Balika's Kernel)
4. Emoji Pack
5. AdBlock [you know block the annoying ads]
6. Init Script [use balika kernel or use universal int.d]
7. Seeder [ i didn't select this]
8. Advanced Power Menu [Like Recovery and Fastboot]
9. Supersu (Root) [ i recommend you to don't flash this instead try this ]
10. Xylon Animation [Amazing animations you will love it i did]
11. MiExplorer [ Just like CM file Manager]
12. VolumeBoost Mod [increased and crystal clear sound]
13. WSM Tools [you know its exposed for miui] + Immersed Statusbar Mod [Change status bar color according to app works with whatsapp,facebook,hike etc.]
Best thing about this is its aroma installer so you can select which MOD you want.
NOTE : Don't use this mentioned below functions if you are on other version of miui than 5.9.17
1. Centerclock Mod (Normal Style)
2. Centerclock Mod (IOS Style)
8. Advanced Power Menu [Like Recovery and Fastboot]
10. Xylon Animation [Amazing animations you will love it i did]
Download
MIUIv7_armani_5.9.24_ModsPack_v3.0.zip (82.86 MB)
http://d-h.st/1PpH
MIUIv7_armani_5.9.17_ModsPack_v2.0.zip (69.81MB)
http://d-h.st/OqdB
Credits
DKILLER123 main thread
Many of you trying to get Viper4Android on Lollipop Custom ROM
Here are some workaround that can help you get it work on your current lollipop rom.
So Lets Begin
1. Enable Root : To Enable Root first enable developer option by going into Settings = About phone and press five times on Build number press back you will developer option and then in developer option you will Enable Root choose app only.
2. In Developer option uncheck use Nuplayer.
3. Download SELinuxModeChanger.apk and change to permissive mode with SELinux Mode Changer SELinuxModeChanger.apk
4. Flash this zip using any custom recovery viper4android_2.3.4.0_Lollipop.zip
5. Open Viper4Android and under settings switch FX Compatible mode to Compatible.
Note : If its not work then delete existing equalizer(MusicFX, AudioFX, DSP Manager ) in your installed rom by using System App Remover.
Ricky Febrian
September 21, 2015
New Google SEO
Bandung, IndonesiaHere are some workaround that can help you get it work on your current lollipop rom.
So Lets Begin
1. Enable Root : To Enable Root first enable developer option by going into Settings = About phone and press five times on Build number press back you will developer option and then in developer option you will Enable Root choose app only.
2. In Developer option uncheck use Nuplayer.
3. Download SELinuxModeChanger.apk and change to permissive mode with SELinux Mode Changer SELinuxModeChanger.apk
4. Flash this zip using any custom recovery viper4android_2.3.4.0_Lollipop.zip
5. Open Viper4Android and under settings switch FX Compatible mode to Compatible.
Note : If its not work then delete existing equalizer(MusicFX, AudioFX, DSP Manager ) in your installed rom by using System App Remover.
These Gapps are only for MIUI6 and MIUI7 on China ROM
Gapps Compatible with bot MIUI v6 and v7
This is Not my work Thanks to MetalGray MIUI forum user. :)
Flashable Zip Include only :
Google Play Store 5.9.11
Google Play services 8.1.14
Google Play services 8.1.14
How to FLASH
1. Boot into Custom Recovery [TWRP]
2. Flash Gapps
3. Wipe Cache & Dalvik
4. Reboot System
Download GAPPS for MIUI v6 and v7 for Redmi 1s
Google Drive
Multi up
Questions
How to Flash TWRP Recovery
How to Temporary Boot into TWRP Recovery
Ricky Febrian
September 14, 2015
New Google SEO
Bandung, IndonesiaGapps Compatible with bot MIUI v6 and v7
This is Not my work Thanks to MetalGray MIUI forum user. :)
Flashable Zip Include only :
Google Play Store 5.9.11
Google Play services 8.1.14
Google Play services 8.1.14
How to FLASH
1. Boot into Custom Recovery [TWRP]
2. Flash Gapps
3. Wipe Cache & Dalvik
4. Reboot System
Download GAPPS for MIUI v6 and v7 for Redmi 1s
Google Drive
Multi up
Questions
How to Flash TWRP Recovery
How to Temporary Boot into TWRP Recovery
I am sharing some Save Build.prop tweaks for your rooted android device.
Copy Build.prop from system folder of your rom /system/build.prop to your pc.
Now Add these line one by one.
or you can do from phone itself.
• Explore/Find the build.prop file
• Make a Backup
• Use the following list to modify values
• Explore/Find the build.prop file
• Make a Backup
• Use the following list to modify values
This is not my work thanks to Developer of Cyanogenmod and AOKP and other developers for tweaks i have indexed all of them at one place.
Note ◘ are safe ◘ are not tested or not safe
◘ Enable On Screen Key
qemu.hw.mainkeys=0
1. Locks default launcher app in memory
ro.HOME_APP_ADJ=1
2. Saves power
pm.sleep_mode=1
ro.ril.disable.power.collapse=0
wifi.supplicant_scan_interval=180
3. Phone rings immediately
ro.telephony.call_ring.delay=0
4. Disables blackscreen issue after a call
ro.lge.proximity.delay=25
mot.proximity.delay=25
5. Better signal
persist.cust.tel.eons=1
ro.config.hw_fast_dormancy=1
6. Better call voice quality
ro.ril.enable.amr.wideband=1
7. Phone will not wake up from hitting volume rocker
ro.config.hwfeature_wakeupkey=0
8. Disables logcat
logcat.live=disable
9. Better scrolling
windowsmgr.max_events_per_sec=150
ro.max.fling_velocity=12000
ro.min.fling_velocity=8000
10. Improves audio and video recording quality
ro.media.enc.jpeg.quality=100
ro.media.dec.jpeg.memcap=8000000
ro.media.enc.hprof.vid.bps=8000000
11. Video acceleration and HW debuggingpm.sleep_mode=1
ro.ril.disable.power.collapse=0
wifi.supplicant_scan_interval=180
3. Phone rings immediately
ro.telephony.call_ring.delay=0
4. Disables blackscreen issue after a call
ro.lge.proximity.delay=25
mot.proximity.delay=25
5. Better signal
persist.cust.tel.eons=1
ro.config.hw_fast_dormancy=1
6. Better call voice quality
ro.ril.enable.amr.wideband=1
7. Phone will not wake up from hitting volume rocker
ro.config.hwfeature_wakeupkey=0
8. Disables logcat
logcat.live=disable
9. Better scrolling
windowsmgr.max_events_per_sec=150
ro.max.fling_velocity=12000
ro.min.fling_velocity=8000
10. Improves audio and video recording quality
ro.media.enc.jpeg.quality=100
ro.media.dec.jpeg.memcap=8000000
ro.media.enc.hprof.vid.bps=8000000
debug.sf.hw=1
debug.performance.tuning=1
video.accelerate.hw=1
12. Disables built in error reporting
profiler.force_disable_err_rpt=1
profiler.force_disable_ulog=1
13. Better net speeds
net.tcp.buffersize.default=4096,87380, 256960,4096,16384,256960
net.tcp.buffersize.wifi=4096,87380, 256960,4096,163 84,256960
net.tcp.buffersize.umts=4096,87380, 256960,4096,163 84,256960
net.tcp.buffersize.gprs=4096,87380, 256960,4096,163 84,256960
net.tcp.buffersize.edge=4096,87380, 256960,4096,163 84,256960
14. 3G tweaks
ro.ril.hep=0
ro.ril.hsxpa=2
ro.ril.gprsclass=12
ro.ril.enable.dtm=1
ro.ril.hsdpa.category=8
ro.ril.enable.a53=1
ro.ril.enable.3g.prefix=1
ro.ril.htcmaskw1.bitmask=4294967295
ro.ril.htcmaskw1=14449
ro.ril.hsupa.category=6
15. Faster streaming videos
media.stagefright.enable-meta=true
media.stagefright.enable-record=false
16. Faster boot
ro.config.hw_quickpoweron=true
17. Disables error checking
ro.kernel.android.checkjni=0
18. Google DNS Tweak
net.rmnet0.dns1=8.8.8.8
net.rmnet0.dns2=8.8.4.4
net.dns1=8.8.8.8
net.dns2=8.8.4.4
19. Screen recognizes only two fingers
ro.product.multi_touch_enabled=true
ro.product.max_num_touch=2
20. Disable notification sound for SD storage insert
persist.service.mount.playsnd=0
21. Enable display dithering
persist.sys.use_dithering=1
22. More volume steps in call.
ro.config.vc_call_steps=20
23. Dalvik Virtual Machine tweaks
dalvik.vm.checkjni=false
dalvik.vm.dexopt-data-only=1
dalvik.vm.heapstartsize=5m
dalvik.vm.heapgrowthlimit=48m
dalvik.vm.heapsize=64m
dalvik.vm.verify-bytecode=false
dalvik.vm.execution-mode=int:jit
dalvik.vm.lockprof.threshold=250
dalvik.vm.dexopt-flags=m=v,o=y
dalvik.vm.stack-trace-file=/data/anr/
traces.txt
dalvik.vm.jmiopts=forcecopy
24. Disables sending of usage data.
ro.config.nocheckin=1
25. Better image quality, lower performance.
persist.sys.use_dithering=1
26. Disable notification while adb is active
persist.adb.notify=0
27. Change LCD density - Default value is 240.
ro.sf.lcd.density=240 (Install a patched market [playstore] after changing it.)
28. Disable strict mode checking.
persist.android.strictmode=0
29. Enables MTP mode.
persist.sys.usb.config=mtp
30. Lock app in memory
sys.keep_app_1=com.your.app.app [your app name]
31. Allow purging of assets
persist.sys.purgeable_assets=1
32. More
persist.sys.shutdown.mode=hibernate
debug.kill_allocating_task=0
persist.sys.ui.hw=1
ro.debuggable=1
ro.config.disable.hw_accel=false
debug.enabletr=true
Many of flash Xcelerate Kernel for better performance and yes thats true xcelerate kernel is better.
But Everyone of face problem when we try to flash ota file we get error so from this method you can revert back to MIUI kernel.
We will use flashify app this amazing app is developed by Christian Göllner
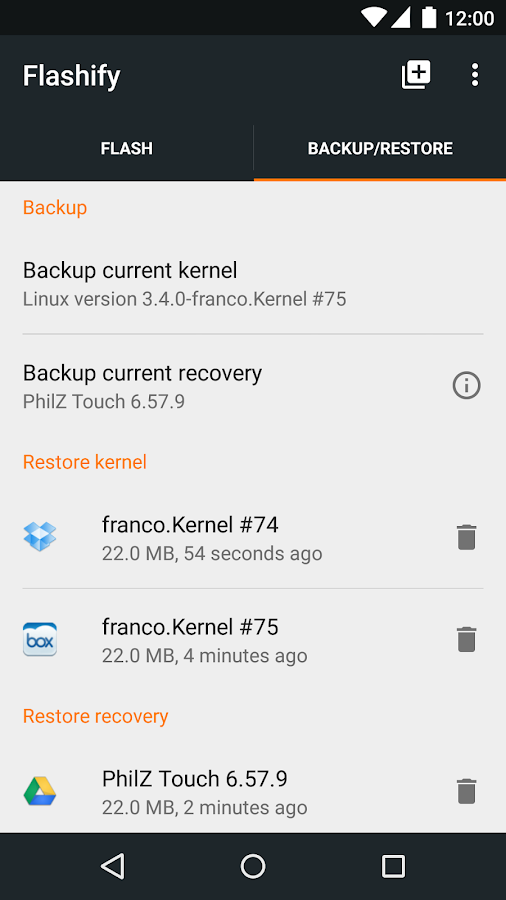
How to Backup kernel
1. First of all download flashify from playstore
2. Now open app after installed and give root permission.
3. Go to Backup/Restore to backup your current kernel.
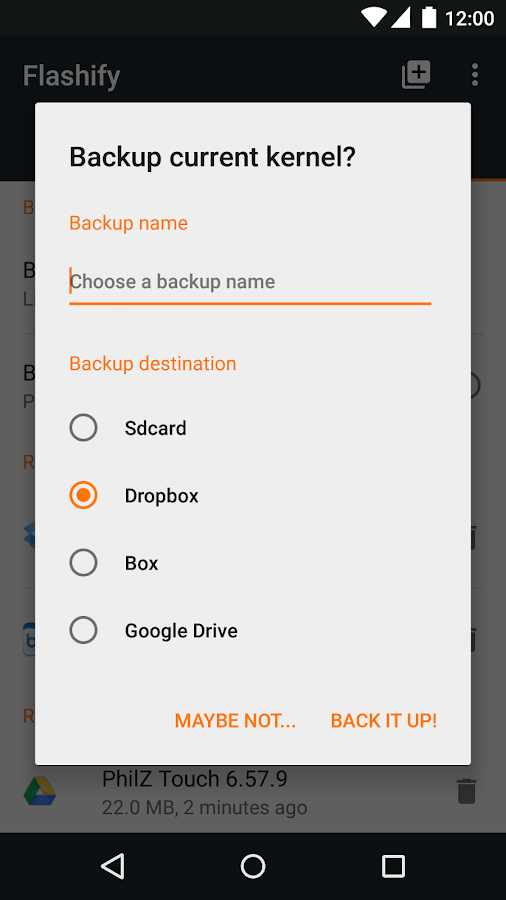
4. Click on Backup Current Kernel.
5. Name Kernel like stock or other as per your preference and save to sd card.
But Everyone of face problem when we try to flash ota file we get error so from this method you can revert back to MIUI kernel.
We will use flashify app this amazing app is developed by Christian Göllner
How to Backup kernel
1. First of all download flashify from playstore
2. Now open app after installed and give root permission.
3. Go to Backup/Restore to backup your current kernel.
4. Click on Backup Current Kernel.
5. Name Kernel like stock or other as per your preference and save to sd card.
How to Flash
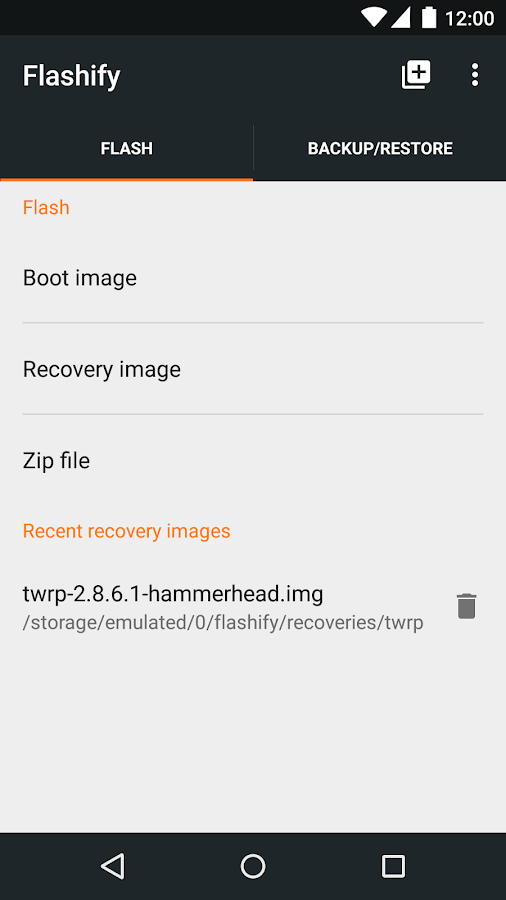
1. Open flashify app you will get these three option.
2. Boot image : boot.img contains the kernel so if you forgot to take back up of your stock kernel then extract boot.img from your rom zip file extract with win rar software.
2. Recovery image : you can flash custom recovery directly.
3. Zip file : Directly flash any flashable zip file from this option don't forget to wipe cache and dalvik.

MIUI Forum user vishalraj08 created Ultimate LAG Remover for redmi 1s works on
Any Stock ROM
AOSP Based ROM
Any Cyanogenmod, PAC, Paranoid, Omni or any other ROM
This Script is Compatible With Android 2.3 To Android M
According to vishalraj08 this tweak will increase PERFORMANCE and use
Download Build 9 [ with 400+ RAM free]
1. Direct Link
2. Mirror Link
NOTE :
1. int.d Support [Universal init.d enabler will be installed when you flash just open the app and activate]
2. Rooted (SuperSU)
3. Busybox installed
4. Custom Recovery
Instruction:
1. Reboot Into TWRP
2. Wipe Cache & dalvik cache
3. Flash and Reboot.
How to use build 9 FOR RAM BOOST with TerminalEmulator
type su
type boost
for nitro x menu
type su
type menu
REBOOT 2 TO 3 TIMES TO ENABLE 400MB VR RAM
Check the increased Benchmark Scores ;)
Source: http://en.miui.com/thread-70623-1-1.html
Ricky Febrian
August 27, 2015
New Google SEO
Bandung, IndonesiaAny Stock ROM
AOSP Based ROM
Any Cyanogenmod, PAC, Paranoid, Omni or any other ROM
This Script is Compatible With Android 2.3 To Android M
According to vishalraj08 this tweak will increase PERFORMANCE and use
◘ Zipalign at each Boot for better performance and Xtreme Booster+ more different mode like multi tasking, Balnced and performance.
◘ Enables GPU rendering, Touch Pressure, Adjustments and Entropy Lag Reducer, Loopy Smoothness will make your phone run smoothly.
◘ New CPU Governor Tweaks 64MB ZRAM CPU Boost Scripts
◘ AdAway will block ads on device Hosts Adrenaline Boost V3
◘ AdAway will block ads on device Hosts Adrenaline Boost V3
◘ Battery Tweaks to have More Energy Efficient and long battery life
Improve video HW Decoder
◘ Other like 60 FPS Unlocker, Better HD Graphics rendering, Enhanced Graphics quality and Images output
◘ RAM Boost Script by dark_optimistic
SOUND :
Less Noise in Audio output
Less Noise in Audio output
Clear sound and Louder Sound
Beats Audio
320kbps Audio Output script
Bass Boost
Sony Sound Mode
Ac!d Sound Mode
Battery Efficient
Improves the Calls quality
Enhance the speakers for playing music
Download Build 9 [ with 400+ RAM free]
1. Direct Link
2. Mirror Link
NOTE :
1. int.d Support [Universal init.d enabler will be installed when you flash just open the app and activate]
2. Rooted (SuperSU)
3. Busybox installed
4. Custom Recovery
Instruction:
1. Reboot Into TWRP
2. Wipe Cache & dalvik cache
3. Flash and Reboot.
How to use build 9 FOR RAM BOOST with TerminalEmulator
type su
type boost
for nitro x menu
type su
type menu
REBOOT 2 TO 3 TIMES TO ENABLE 400MB VR RAM
Check the increased Benchmark Scores ;)
Source: http://en.miui.com/thread-70623-1-1.html
This Gapps package is for rom running android version kitkat 4.4.4 and specially for MIUI6/7 Chinese ROM. This is tested on MIUI6 Chinese ROM so if you are looking for GAPPS then go for it.
What included?
This Gapps zip is divided in two parts you can choose between two
Recommended Section (Install all of it, RECOMMENDED!)
1.PlayStore
2.Google Account
3.Google Play Services
4.Google Play framework
Other Google Apps Section (Choose what you want optional)
1.Google
2.Chrome
3.Google keyboard
4.G-Mail
5.Google Calander
6.Google Now Launcher
7.Google maps
8.Play Music
9.Google+
10.Hangout
11.Youtube
HOW TO INSTALL
1.Download the zip (Link)
2.Flash through TWRP Recovery Only.
Important Link how to temporary boot TWRP RECOVERY
3.After installation complete, reboot, no need to wipe anything
Download GAPPS
Ricky Febrian
August 27, 2015
New Google SEO
Bandung, IndonesiaWhat included?
This Gapps zip is divided in two parts you can choose between two
Recommended Section (Install all of it, RECOMMENDED!)
1.PlayStore
2.Google Account
3.Google Play Services
4.Google Play framework
Other Google Apps Section (Choose what you want optional)
1.Google
2.Chrome
3.Google keyboard
4.G-Mail
5.Google Calander
6.Google Now Launcher
7.Google maps
8.Play Music
9.Google+
10.Hangout
11.Youtube
HOW TO INSTALL
1.Download the zip (Link)
2.Flash through TWRP Recovery Only.
Important Link how to temporary boot TWRP RECOVERY
3.After installation complete, reboot, no need to wipe anything
Download GAPPS


